Have you ever looked at photos of people with perfect cheekbones and wondered how they did it? Maybe you bought a contour kit but got confused and put it back in the drawer. You are not alone. Lots of people think contouring is too hard or just for makeup artists. The truth is, you can learn to contour your face at home with just a few simple steps. You do not need fancy brushes or expensive products. You just need to know where to put the dark and light colors. This guide will show you exactly how to do it. No hard words. No confusing steps. Just simple tips that work.
What Is Face Contouring And Why Should You Try It?
Contouring is a way to utilize cosmetics to make your confront see diverse. Think of it like drawing shadows and light on paper. When you put dim colors in a few spots, those spots see littler or more profound. When you put light colors in other spots, those spots see greater or stand out more. That is all forming truly is. You are fair playing with dim and light. People form their faces for many reasons. A few need their nose to see more slender. A few need their cheekbones to appear more. A few need to make their brow see littler. Forming can offer assistance with all of these things. The best portion? You wash it off at the conclusion of the day. There is no lasting alter. You get to attempt diverse looks and see what you like.
You do not require to be a cosmetics master to do this. You fair require to know the fundamental spots. Your confront has characteristic shadows as of now. If you see in the reflect in typical light, you will see a few regions are darker than others. Forming fair makes those shadows a small more grounded. It is like giving your confront a small offer assistance to see its best.
Read Also: Eye Makeup Tips to Make Your Eyes Look Bigger
What Products Do You Need To Start Contouring?
You likely have most of what you require as of now. Let me tell you the basic things to get.
For cream contouring:
- A concealer or establishment that is two shades darker than your skin
- A concealer or establishment that is one shade lighter than your skin
- A wipe or your fingers
- Setting powder
For powder contouring:
- A powder that is two shades darker than your skin
- A powder that is one shade lighter than your skin
- A cushy brush
- A little calculated brush
That is it. You do not require to purchase those huge palette boxes with ten colors. Most of those shades will fair sit there unused. Begin with what you have. If you have two concealers at domestic right presently, check if one is darker than the other. If yes, you can begin practicing today.
Many drugstore brands offer reasonable form sticks. They see like enormous colored pencils. One conclusion is dull and the other conclusion is light. These are extraordinary for fledglings since they are simple to control. You fair draw a line and mix. No complicated steps.
The wipe you utilize things as well. A clammy wipe gives a delicate, characteristic see. Your fingers work fine as well. Your body warm makes a difference soften the item into your skin. So do not think you must purchase costly devices. Your hands have been with you your entirety life. They know how to blend.
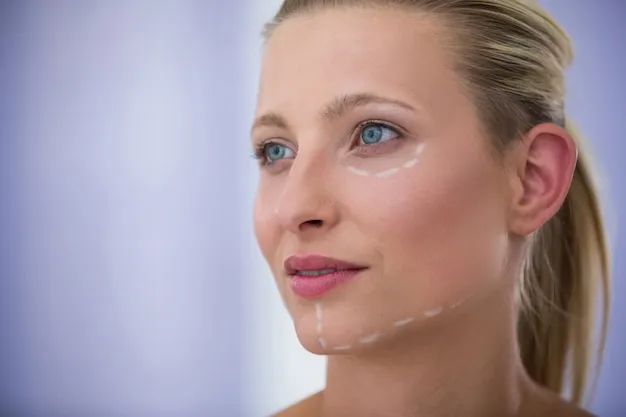
Where To Put The Dark Colors On Your Face?
This is where most individuals get befuddled. They see cosmetics recordings and cannot take after where the brush goes. Let me make this exceptionally simple.
- The dim color goes where you need shadows. Here are the primary spots:
- Under your cheekbones. Suck your cheeks in like a angle. See that empty line beneath your cheekbone? That is where the dim color goes. Begin close your ear and go midway toward your mouth. Do not go all the way to your mouth.
- Along your hairline. If you have a brow, clear dull color along the beat close your hair. This makes your temple see smaller.
- Down the sides of your nose. Draw two lean lines on each side of your nose. Do not make them as well thick or your nose will see dirty.
- Under your jawline. Put dim color right beneath your chin bone. This makes your jaw see sharper.
- On your sanctuaries. These are the spots on the sides of your temple close your eyes. A small dull color here makes a difference shape your face.
- That is all the spots you require to know. Begin with fair one or two ranges the to begin with time. Possibly fair attempt your cheekbones. Once you feel great almost that, include another range. You do not have to form your entirety confront on day one. Take your time.
Where To Put The Light Colors On Your Face?
The light color is for bringing parts of your confront forward. Think of it like sparkling a little light on the spots you need individuals to notice.
Here are the places for light colors:
Under your eyes. Put light concealer here in an upside down triangle shape. The wide portion is beneath your eye and the point goes down toward your cheek. This brightens your entirety face.
- Down the center of your nose. A lean line of light color makes your nose see straighter and thinner.
- On your chin. A little speck in the center of your chin brings light there.
- In the center of your brow. A little circle or line here makes your temple see smoother.
- Above your cheekbones. Right on the tall portion of your cheekbone, put a small light color. This is where light normally hits your face.
- The cupids bow of your lips. This is the small plunge over your best lip. A speck of light here makes your lips see fuller.
See how straightforward this is? Dull colors go in the plunges and edges. Light colors go on the tall focuses and centers. Your confront as of now has these shapes. You are fair making a difference them appear up more.
How To Blend Everything So You Look Natural?
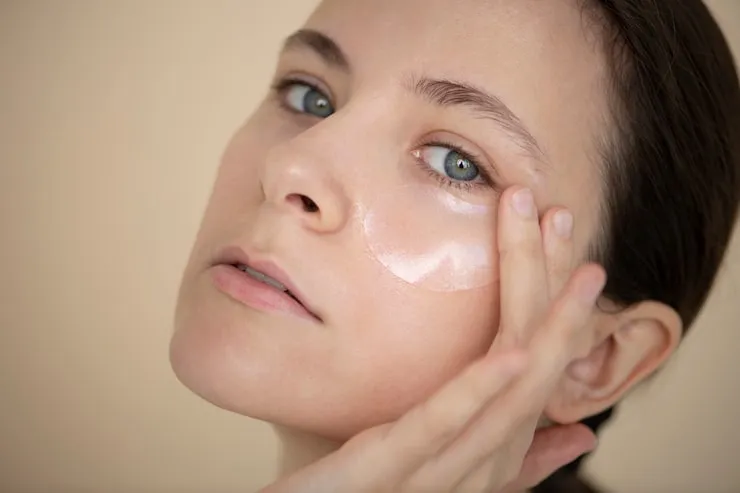
Blending is the most vital portion. Awful mixing makes you see streaky. Great mixing makes individuals inquire if you are indeed wearing makeup. Start with a little sum of item. You can continuously include more. You cannot effectively take absent as well much. Put your dull colors on to begin with. At that point put your light colors on. At that point begin blending. Use your wipe to tap, tap, tap. Do not swipe or rub. Tapping keeps the item where you put it. Swiping moves it all over and ruins your shape. Think like you are squeezing the cosmetics into your skin, not wiping it away.
Blend the edges to begin with. The center of your form line ought to remain dim. The edges ought to blur into your skin. This is what makes it see like a genuine shadow and not fair a brown line on your face. Take your time with this step. Great mixing takes two or three minutes. If you surge, it will not see right. Put on a few music or a podcast and fair tap absent. See in distinctive lights. Turn toward your window. Turn toward your room light. If you see any cruel lines, tap them more. If you are utilizing powder items, utilize a clean feathery brush and whirl it delicately over the edges. This relaxes everything. You need individuals to see your confront, not your makeup.
Read: Beginner’s Guide to Contour and Highlight
Common Mistakes Beginners Make And How To Fix Them
Everyone makes botches when they begin. I made all of these as well. Here is how to spot them and settle them fast.
Using the off-base shade of dim. Numerous apprentices choose a form color that is as well orange or as well gray. Your form ought to see like a shadow, not soil. If your form looks orange, it is as well warm. See for colors that are more impartial or cool. Think of how a genuine shadow looks. It is grayish, not reddish. Putting dim color as well moo on cheeks. If you put your form beneath your cheekbone but as well moo, your confront will see saggy. A great test is to put your finger on your cheekbone and feel the bone. Your form ought to sit right beneath that bone, not lower.
Not mixing sufficient on the nose. Nose form is simple to mess up. If you mix as well much, it vanishes. If you mix as well small, you have two brown stripes on your nose. The trap is to mix for the most part the edges and take off a small color in the center of each side. Forgetting your neck and ears. If you form your confront but your neck is a distinctive color, it will see bizarre. Mix a small item down your neck and on your ear cartilage. This interfaces everything. Using as well much light color. Individuals think more light = more shine. But as well much light concealer looks cakey and settles into fine lines. Utilize less than you think you require. You can continuously include a modest bit more.
How To Choose The Right Contour Color For Your Skin?
- This is less demanding than cosmetics brands need you to think. You do not require a extraordinary "form" item. You require something two shades darker than your skin.
- For reasonable skin: See for taupes and delicate browns. Dodge orange tones. Numerous reasonable individuals like form colors that see nearly grayish brown. This sounds interesting but it looks like a genuine shadow.
- For medium skin: You have more alternatives. Warm browns and unbiased browns both work. You can go a small more profound with your shade. Think of a brown that is like coffee with a small cream.
- For profound skin: Wealthy browns and indeed profound red-browns can work. The key is to discover something that is darker than your skin but still looks like you. Test the color on your jawline. If it looks like a common shadow, it is right.
- If you are still uncertain, go to a drugstore with great return approach. Purchase two or three shades. Attempt them at domestic in normal light. Return the ones that do not work. This is completely ordinary and parts of individuals do this.
- Your skin tone might alter between summer and winter. You might require a darker form in July and a lighter one in January. That is affirm. Keep face contouring for simple contour routine.
Quick Tips For Making Your Contour Last All Day

You went through time making your confront see great. You need it to remain that way. Here are straightforward things that help.
Set with powder. If you utilize cream items, tap a small translucent powder over your confront. This locks everything in put. Utilize a cushy brush and exceptionally small powder. Tap off the additional some time recently it touches your face. Use setting shower. A few spritzes of setting splash makes a difference dissolve everything together. Hold the bottle at arm's length and shower in an X shape, at that point a T shape. This covers your entire confront evenly.
Blot amid the day. Oil can break down your cosmetics. If you get glossy, press a tissue tenderly on your confront. Do not rub. Fair press. This takes absent oil but clears out your form in place. Fix botches with a clean wipe. If you smear your form amid the day, utilize a clean finger or wipe to tap the range. Do not include more item. Fair mix what is as of now there.
You May Also Like: How to Apply Eyeliner for Women with Shaky Hands
Frequently Asked Questions
Do I have to contour every single day?
No, you never have to form. It is your choice. Numerous individuals as it were form for photographs, extraordinary occasions, or days when they need to feel additional put together. For regular, numerous individuals fair do their customary cosmetics and skip form. Do what feels right for you. There is no run the show that says you must form. Your confront is lovely with or without it.
Can I contour if I have acne or textured skin?
Yes, you can. But you require to be delicate. Difficult tapping with a wipe can bother breakouts. Utilize clean fingers instep and be exceptionally delicate. Too, maintain a strategic distance from putting overwhelming item specifically on dynamic pimples. Form around them, not over them. A few individuals with finished skin favor powder form since it is lighter. Attempt both and see what your skin likes best. Continuously wash your simple contour routine.
What is the difference between contour and bronzer?
This befuddles a parcel of individuals. Form is for changing the shape of your confront. It goes in particular spots to make shadows. Bronzer is for warmth and color. You clear bronzer where the sun actually hits your confront - your brow, cheeks, nose, and chin. Form colors are ordinarily cooler and grayer. Bronzer colors are hotter and more brilliant. You can utilize both in one cosmetics see. Form to begin with to shape, at that point bronzer on beat to include warmth.
You presently know everything you require to begin forming at domestic. Begin straightforward. Choose one or two regions and hone when you have free time. See at your confront in the reflect and take note where shadows normally drop. Work with your possess confront shape, not against it. The more you hone, the simpler it gets. Before long you will know precisely where to put your brush without indeed considering around it. Cosmetics ought to be fun, not upsetting. So play around, attempt unused things, and if it does not see idealize the to begin with time, fair wash it off and attempt once more tomorrow.